API 570 – FINAL EXAM [CLOSED] QUESTIONS & ANSWERS
Instructions: Choose only one answer which you think is most appropriate. Use the attached answer sheet in answering the following questions.
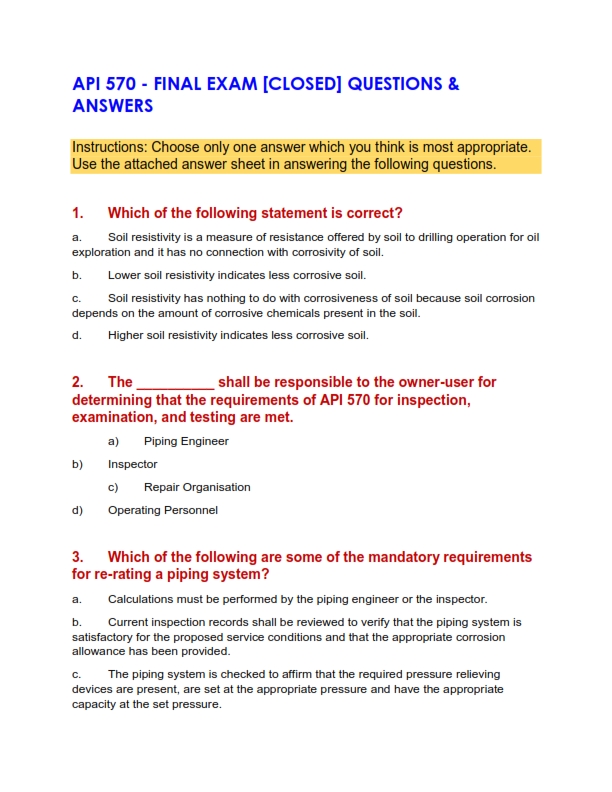
1. Which of the following statement is correct?
a. Soil resistivity is a measure of resistance offered by soil to drilling operation for oil exploration and it has no connection with corrosivity of soil.
b. Lower soil resistivity indicates less corrosive soil.
c. Soil resistivity has nothing to do with corrosiveness of soil because soil corrosion depends on the amount of corrosive chemicals present in the soil.
d. Higher soil resistivity indicates less corrosive soil.
2. The __________ shall be responsible to the owner-user for determining that the requirements of API 570 for inspection, examination, and testing are met.
a) Piping Engineer
b) Inspector
c) Repair Organisation
d) Operating Personnel
3. Which of the following are some of the mandatory requirements for re-rating a piping system?
a. Calculations must be performed by the piping engineer or the inspector.
b. Current inspection records shall be reviewed to verify that the piping system is satisfactory for the proposed service conditions and that the appropriate corrosion allowance has been provided.
c. The piping system is checked to affirm that the required pressure relieving devices are present, are set at the appropriate pressure and have the appropriate capacity at the set pressure.
d. All of the above
4. After completion of alterations a pressure test is/will:
a. Normally required
b. Not required at all
c. Depend on opinion of piping inspector
d. Only “a” and “c” above
5. Name a part of a piping system that thickness measurements are not normally routinely taken:
a) Elbows
b) Expansion loops
c) Tees
d) Valves
6. Pressure decay method is:
a. A technique adopted for checking the leakage in above ground piping
b. A technique used for checking leakage in underground piping
c. A technique used for calibration of pressure gauges
d. A technique used for releasing the overpressure in piping
7. Which of the following are areas on piping systems which are susceptible to CUI during the range of 25°F to 250°F:
a. All the area which is below insulation
b. Insulated areas below steam vents
c. Insulated piping exposed to cooling tower mist
d. “b” and “c” above
8. Listed below are several examples of piping system. Which is class I piping for flammable fluids?
a) Readily vaporizing on leakage
b) Slowly vaporizing on leakage
c) No significant vaporization
d) All of above
9. Which of the following documents referenced in API 570 addresses hot tapping?
a. API 2201
b. API 574
c. ASME B 31 G
d. None of the above
10. The preferred method for inspecting piping coating is:
a. Visual inspection only
b. Holiday detection
c. M.P. Check
d. D.P. Check
11. For which of the following, the approval from piping engineer is not mandatory:
a. Changing the damaged flange to a new flange of same rating and material
b Alteration on piping changing a nozzle size from one not requiring reinforcement pad to the one requiring reinforcement pad
c. For both a and b
d. For none of the above
12. Fillet welded patches (lap patches) shall be designed by:
a) An engineer expert in corrosion
b) The inspector
c) The piping engineer
d) The repair organization
13. For a project involving piping welding at site by 10 welders, (with only one qualified welder) procedure and 9 welders were to be qualified. In this case, identify correct statement from the following:
a. 9 welders qualification must be performed before procedure qualification.
b. 9 welders qualification should be performed after procedure qualification is carried out using qualified welder.
c. Out of Welder qualification and procedure qualification, anything can be performed before.
d. Welder qualification and procedure qualification must be performed simultaneously, without waiting for the test results.
14. Guided bend test represents:
a. Ductility of weld
b. Strength of weld
c. Soundness of weld
d. Both soundness and ductility of weld
15. All positions of groove welds are qualified by
a. Pipe positions 1G and 5G
b. Pipe positions 2G and 5G
c. Pipe position 5G and 3G
d. None of the above
16. According to ASME Sec. IX, a welder for SMAW can be qualified by following minimum tests (for 1G pipe position):
a. 1 tensile and 2 bend tests
b. 2 bend tests
c. 2 tensile tests and 1 bend tests
d. 1 tensile and 1 radiography
17. Identify incorrect statement from following
a. A welder performing procedure test is also qualified in that position.
b. Supplementary essential variables become essential variables when impact test is specified.
c. For procedure qualification, the test can be performed in any position as the position is not essential variable for procedure qualification.
d. A 3G welder qualified in SMAW process can be employed for TIG welding also in that position.
18. Procedure Qualification Record is a document which can be revised time to time.
a. True
b. False
c. Depends on company policy
d. Depends on client of the company
19. Use of Radiography is made for:
a. Performance qualification only
b. Procedure qualification only
c. Both a and b
d. Use of radiography is not permitted by ASME Sec. IX.
20. When dial-type indicating and recording pressure gauges are used to monitor leak testing, the maximum gauge range shall not exceed which multiple of the expected test pressure?
a. 1 ½ times
b. 2 ½ times
c. 3 times
d. 4 times
21. A radiographic technique in which radiation passed through two walls and both the walls are viewed on the same radiograph (double wall, double image – ellipse) the limitation for the outside diameter is:
a. 3-1/2”
b. 2”
c. 4”
d. Any diameter possible
22. Following data is available to compute remaining life of a piping circuit:
Minimum required thickness = 0.422 in
Actual thickness measured = 0.512 in
Corrosion rate = 0.018 in / year
Remaining life for this circuit will be:
a. 5.0 years
b. 4.5 years
c. 6.0 years
d. None of above
23. Common locations which are susceptible to CUI on the insulated piping are:
a. All penetrations or breaches in the insulation jacketing such as vents, drains, piping hangers
b. Termination of insulation at flanges
c. All insulated bends and elbows
d. a and b above
24. The accuracy of magnetizing equipment that is equipped with an ammeter shall be verified:
a. Each year
b. Each two years
c. When possible
d. Every 6 months
25. The WPS and the PQR are used to determine:
a. If the welder is able to deposit sound weld metal.
b. If the welder is able to operate welding equipment.
c. The welder’s ability to produce welds that are radiographically free of defects.
d. If a weldment has the required properties for the intended application (strength, ductility)
26. Which of the following penetrant system is generally considered least sensitive?
a. Water-washable – visible dye.
b. Solvent removable – visible dye.
c. Water-washable – fluorescent dye.
d. Post-emulsification – visible dye.
27. As soon as possible after completing an inspection, the Inspector should:
a. Review the inspection records and schedule the next inspection
b. Always require a hydrotest
c. Sign all RT records
d. Notify the Piping Engineer
28. The nondestructive examination method to be used for a particular inspection should be determined by the:
a. Availability of certified NDE examiners.
b. Length of time since the last inspection.
c. Age of the component to be inspected.
d. Type, location, and orientation of the expected flaws.
29. To verify satisfactory PWHT the test conducted is:
a. Radiography
b. Ultrasonic
c. Hardness survey
d. None of above
30. In visual testing for qualifying the procedure, a defect of which minimum width shall be used:
a. 1/16”
b. 1/8”
c. 1/32”
d. None of the above
31. Visual examiner should pass Jaeger J-1 check:
a. Annually
b. Six monthly
c. Once in 3 years
d. None of the above
32. The pressure gauges for leak testing shall be calibrated as an ASME Sec. V requirement, at least:
a. Every six months
b. Every one year
c. Every three years
d. None of the above
33. It is decided to carryout a surface NDT for austenitic S.S. pipe welds. Choose the best combination.
a. Penetrant testing with Halogen free developer
b. Penetrant testing with any aqueous developer
c. Magnetic particle testing with wet particles
d. Magnetic particle testing with dry particles
34. In ultrasonic testing, for thickness measurement on corroded surface, use:
a. CRT read out
b. Digital read out
c. Any of above
d. None of above.
35. An example of service-specific corrosion is:
a) Corrosion under insulation in areas exposed to steam vents
b) Unanticipated acid or caustic carryover from processes into non-alloyed piping
c) Corrosion in deadlegs
d) Corrosion of underground piping at soil-to-air interface
36. When a pressure test is not necessary or practical, what shall be utilised in lieu of a pressure test?
a) PMI Testing
b) Non-destructive examination
c) Vacuum visual examination
d) Hammer Testing
37. For which of the following can yoke technique be used?
a. Sub-surface cracks
b. Surface cracks
c. Both a and b
d. None of a or b
38. The pipe welding test position in which the pipe is horizontal and rotated so that welding takes place at or near the top is designated as?
a. 2 G
b. 5 G
c. 3 G
d. 1 G
39. API 578 gives rules for Alloy Verification for:
a. Carbon steel piping material for old or new piping
b. Alloy steel piping materials, for old or new piping
c. Carbon steel materials used for old piping only
d. Alloy steels used for old piping only
40. For thickness measurement of pipes NPS 1 and smaller, NDT technique employed would be:
a. Ultrasonic technique
b. Radiographic profile technique
c. Anyone is okay.
d. None are okay.
41. API 578 requires at least _________ electrodes to be PMI tested from each box.
a. One
b. Two
c. Minimum 10%
d. All
42. Which of the following make pipe system most susceptible to CUI?
a. Painted pipes operating at 150º F
b. Insulated pipes operating at 150º F
c. Projections, penetrations in “a”
d. Projections, penetrations in “b”
43. Freeze damage can occur in case of which of the following fluids:
a. Water only
b. Oil only
c. Water and aqueous solutions
d. None of the above
44. For calculating MAWP of Piping Circuit which is put in service the wall thickness used in computations is:
a. Actual thickness as determined by inspection.
b. Actual thickness minus the estimated corrosion loss before the date of next inspection
c. Actual thickness minus twice the estimated corrosion loss before the date of next inspection
d. None of the above
45. When checking Titanium materials for cracks using PT methods only liquid penetrants:
a. with low or no nitrides should be used
b. with low or no carbides should be used
c. with high or medium chlorides should be used
d. with low or no chlorides should be used
46. As per API 570 for bolted flanged joints, bolts and nuts are considered as acceptably engaged if the lack of complete engagement is:
a. Not more than two threads
b. Not more than one thread
c. Bolts and nuts are engaged at least 50% of threads in the nuts
d. Bolts shall completely extend through nuts
47. Inspection of piping systems is carried out for purpose of:
a. Safety
b. Reliability of operation
c. Regulatory requirements
d. All of above
48. For a typical “injection point pipe circuit” starts upstream of injection point from a distance of
a. 3 times pipe diameter or 12 inches which ever is greater
b. 2 times pipe diameter or 12 inches which ever is greater
c. Fixed 12 inches irrespective of pipe diameter
d. 3 times pipe diameter or 12 inches whichever is smaller
49. For MT examination by Prod technique the spacing between prods shall be between:
a. 4 inches to 12 inches
b. 4 inches to 10 inches
c. 3 inches to 10 inches
d. 3 inches to 8 inches
50. API 578 Material Verification can be applied for:
a. New and in-service carbon steel piping
b. New and in-service alloy piping
c. Only in service carbon steel piping d. Only for in-service alloy piping


![Read more about the article TOP 120+ Single Phase Induction Motors MCQ Download Free[PDF]](https://englogs.com/wp-content/uploads/2023/07/TOP-120-Single-Phase-Induction-Motors-MCQ_0221-300x197.jpg)